

Service business: lead to paid to repeat
Run a service business end to end in Alur, from the first enquiry to the paid invoice and the next visit
A service business (a salon, a clinic, a tutor, a consultant, a repair shop) runs the same loop for every customer: someone asks, books, comes in, pays, and ideally comes back. This guide walks through each stage, says what Alur does and what you still do by hand, and ends with a complete example you can build.
Short on time? The Service business template creates stages 2 to 9 in one click: the lead form, the link, a Visits table with the billing columns, and the nine workflows of the example below. Apply it, connect Resend and Mayar, and publish. The rest of this guide explains what it built.
The pipeline at a glance
| Stage | What happens | In Alur | Automatic? |
|---|---|---|---|
| 1. Attract | People find you | Content calendar template, AI Text and AI Image | Yes, once posts are scheduled |
| 2. Capture | Someone leaves their details | Lead capture template: a form, a Leads table, two emails | Yes |
| 3. Book | They pick a time | A link; its link goes in the lead's email | Yes |
| 4. Confirm and remind | They get a confirmation and a reminder | Scheduling trigger, a daily Cron | Yes |
| 5. Deliver | You do the work | You tick Served and enter the price on the visit | By hand |
| 6. Invoice | They get a payment link | Mayar step (Create invoice) and a Resend email | Yes, within the hour |
| 7. Get paid | Payment is recorded, receipt sent | Payment Trigger | Yes |
| 8. Review | You ask for a review | A daily Schedule and an email | Yes |
| 9. Rebook | You invite them back | A daily Schedule and an email with your booking link | Yes, on the date you set |
Two things stay manual on purpose: doing the work (stage 5) and deciding what to charge. Everything else runs from your tables.
The stages
1. Attract
Plan posts in the Content calendar table and let a workflow publish them on their date through Zernio. An AI Text step can draft captions and an AI Image step can make pictures. Put your form link and your booking link in your bio and posts.
2. Capture the lead
The Lead capture template gives you a Contact us form, a Leads table and two workflows: one emails you, the other confirms to the lead. Add a Phone column to the form: Mayar needs a mobile number on every invoice (stage 6).
3. Book
Create a link with your hours and the length of a visit. Bookings appear under Scheduling → Bookings. Add its link to the lead's confirmation email, so the reply to an enquiry is "pick a time here".
4. Confirm and remind
A workflow on the Scheduling trigger can email the booker when they book, with their cancel and reschedule link. Add a reminder: a workflow that runs every day at 17:00, reads tomorrow's confirmed bookings with a Scheduling step and emails each one (see the example below).
5. Deliver the service
Every new booking is added to the Visits table. After the visit, open that table and fill in Service, Price and Phone, and tick Served. This is the hand-over from you to the automation: nothing is billed until Served is ticked.
6. Invoice
A workflow runs every hour, finds visits that are served but not yet invoiced, creates a Mayar invoice for each, saves the invoice ID and payment link on the visit, and emails the link. It marks the visit Invoiced right after the invoice is created, so a later failure (for example the email) never creates a second invoice.
7. Get paid
When the customer pays, Mayar tells Alur and the Payment Trigger starts a workflow that marks the visit Paid and emails a receipt. See the note on matching a payment to its visit.
8. Ask for a review
A daily workflow finds paid visits that haven't had a review request, emails your review link (Google Maps, for example) and marks them so nobody gets asked twice.
9. Invite them back
When you serve someone, set Next visit to the date they should come back (six weeks for a haircut, six months for a dental check). A daily workflow emails your booking link to everyone whose Next visit is today.
Implementation example: Sari Hair Studio
A salon with one stylist. You need: a Resend connection and a Mayar connection with its webhook URL pasted into Mayar's dashboard.
The Service business template builds all of the tables and workflows below for you (its workflows are named a little differently). To build them by hand instead, apply the Lead capture template, create a link, create a Visits table and add the rest as described.
In the steps below, names like invoice or each stand for your own steps;
the variable picker inserts the right names for you.
The tables
Leads (from the Lead capture template). Add Phone (Text) and make it fillable on the form.
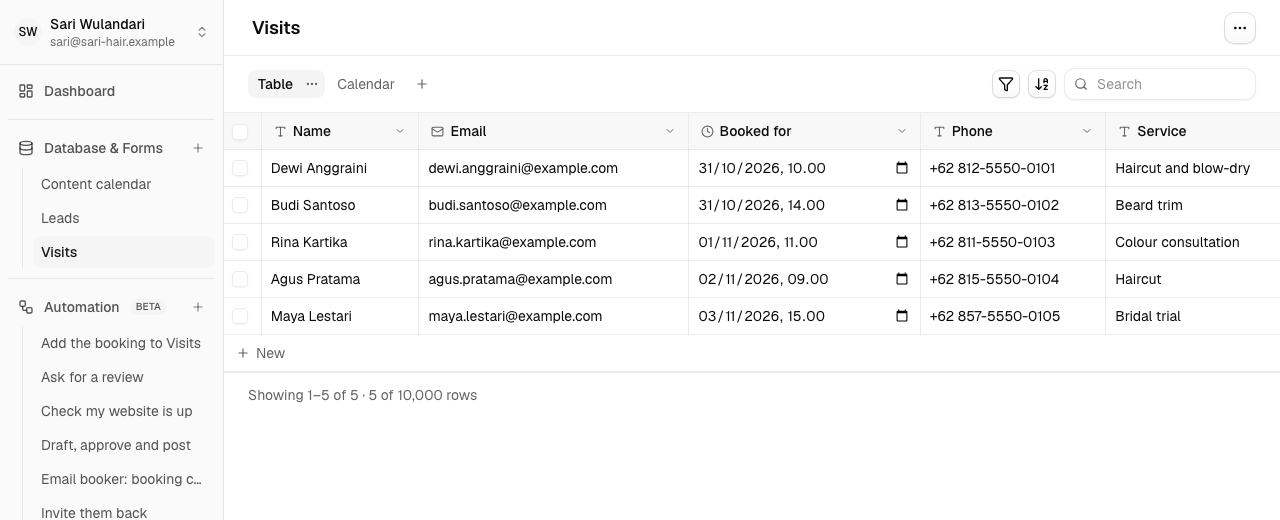
Visits, one row per booking. Keep Name and add:
| Column | Type | Filled by |
|---|---|---|
| Workflow G | ||
| Booked for | Date and time | Workflow G |
| Phone | Text | You (the booking page doesn't ask for it) |
| Service | Text | You, after the visit |
| Price | Number | You, after the visit |
| Served | Checkbox | You, after the visit |
| Invoiced | Checkbox | Workflow C |
| Invoice ID | Text | Workflow C |
| Payment link | Text | Workflow C |
| Paid | Checkbox | Workflow D |
| Review sent | Checkbox | Workflow E |
| Next visit | Date | You, after the visit |
| Rebook sent | Checkbox | Workflow F |
Use the Calendar view by Booked for to see the week.
Workflow A: reply to a lead with the booking link
From the Lead capture template. In the confirm to the lead email, add your
scheduling page's link: Thanks {{ trigger.row.name }}, pick a time that suits you: https://…/@your-handle/appointments.
Workflow G: add each booking to Visits
- Scheduling Trigger: your link, Created.
- Database (Visits, Add a row): Name
{{ trigger.name }}, Email{{ trigger.email }}, Booked for{{ trigger.start }}.
Workflow B: remind tomorrow's bookings
- Cron Trigger: every day at 17:00, your time zone.
- Scheduling step: your link, Status Confirmed, From day and
To day both
{{ system.tomorrow }}. - For each over
{{ scheduling.items }}. - Inside the loop, Send Email: To
{{ each.item.email }}, Subject "See you tomorrow", body with{{ each.item.start }}(a UTC time; write the time in your own words if you prefer).
Workflow C: invoice served visits
- Cron Trigger: every hour, 9:00 to 18:00.
- Database (Visits, Find rows): Served is equal to true and Invoiced is equal to false.
- For each over
{{ find.rows }}. - Inside the loop, Mayar (Create invoice): Customer name
{{ each.item.name }}, Customer email{{ each.item.email }}, Customer mobile{{ each.item.phone }}, Item{{ each.item.service }}, Price{{ each.item.price }}, Redirect URL your thank-you page. - Database (Visits, Update rows): Row ID is equal to
{{ each.item.id }}; set Invoiced to true, Invoice ID to{{ invoice.id }}, Payment link to{{ invoice.link }}. - Send Email: To
{{ each.item.email }}, Subject "Your invoice from Sari Hair Studio", body "Pay here:{{ invoice.link }}".
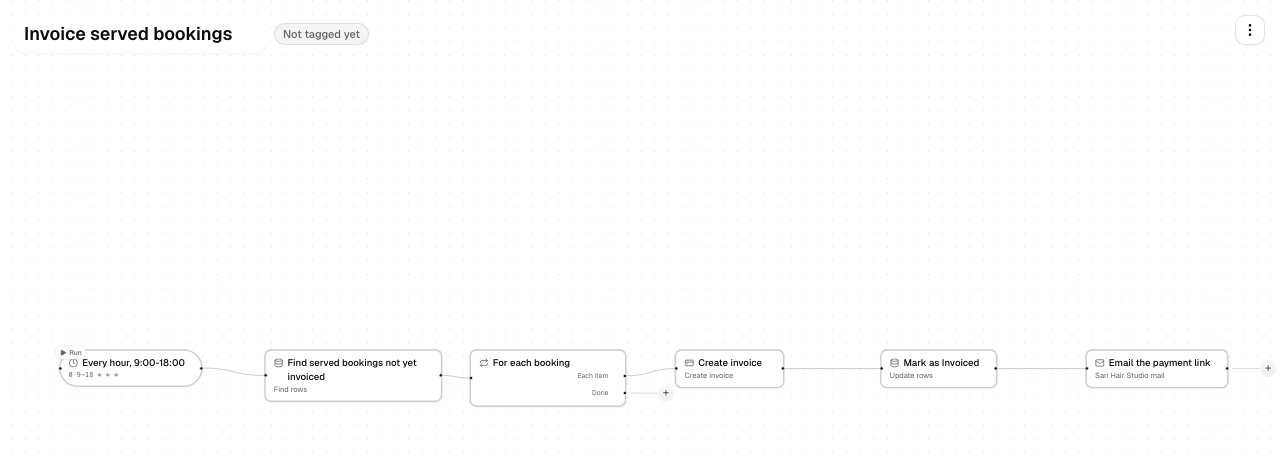
Keep step 5 directly after step 4. If the invoice is created but the email fails, the visit is already marked Invoiced, so the next hour doesn't bill again; resend the link by hand from the Payment link column.
Workflow D: record the payment
- Payment Trigger on your Mayar connection.
- Database (Visits, Find rows): Email is equal to
{{ trigger.customerEmail }}, Invoiced is equal to true, Paid is equal to false. - For each over
{{ find.rows }}. - Inside the loop, Database (Update rows): Row ID is equal to
{{ each.item.id }}; set Paid to true. - After the loop (Done), Send Email: To
{{ trigger.customerEmail }}, Subject "Payment received", body with{{ trigger.amount }}.
Workflow E: ask for a review
- Cron Trigger: every day at 10:00.
- Database (Find rows): Paid is equal to true, Review sent is equal to false.
- For each; inside it Send Email with your review link, then Database
(Update rows, Row ID
{{ each.item.id }}): Review sent true.
Workflow F: invite them back
- Cron Trigger: every day at 9:00.
- Database (Find rows): Next visit is equal to
{{ system.today }}, Rebook sent is equal to false. - For each; inside it Send Email "Time for your next visit?" with your
scheduling page link, then Database (Update rows, Row ID
{{ each.item.id }}): Rebook sent true.
Publish all seven workflows. Test each with Test run first: Workflow D's Test run sends a made-up payment, and nothing is charged.
Matching a payment to a booking
Workflow D matches a payment by the customer's email. That is reliable when a
customer has one unpaid invoice at a time, which is usual for a salon. If the
same email can have several unpaid invoices, all of them are marked paid by one
payment, so the email lookup only gives you candidate visits. To be strict, add a
Get invoice step in the loop
that reads {{ each.item.invoice_id }} and only mark the row paid when its
status says so.
You can also check the run's {{ trigger.data }} to see which field Mayar sends
that names the invoice, and match on that instead. Look at the payload in the
run; don't assume the identifier is always there.
Limits and failure handling
Rows per run
A Find returns 50 rows unless you raise Max rows (at most 100), and a For each runs at most 100 items, so one invoice run handles up to 100 visits.
Ticking a box doesn't start a workflow
Alur can't yet start a workflow the moment you tick a box. Stages 6, 8 and 9 run on a schedule, so an invoice goes out within the hour after you tick Served.
Revenue totals
Alur doesn't add up numbers, so totals and revenue reports stay in Mayar's dashboard for now.
Costs
Every email counts against your Resend plan; every invoice is a real Mayar invoice, so build with a Sandbox Mayar connection first and switch to Production when the runs look right.
Failed invoice creation
Create invoice is never retried automatically, so a failed invoice step needs a look at Mayar's dashboard before you run it again. See Mayar payments.